Storage in XCP-ng
Storage in XCP-ng is quite a large topic. This section is dedicated to it. Keywords are:
- SR: Storage Repository, the place for your VM disks (VDI SR)
- VDI: a virtual disk
- ISO SR: special SR only for ISO files (in read only)
Please take into consideration, that Xen API (XAPI) via their storage module (SMAPI) is doing all the heavy lifting on your storage. You don't need to format drives manually.
We encourage people to use file based SR (local ext, NFS, XOSTOR…) because it's easier to deal with. If you want to know more, read the rest.
📑 Storage types
There are two types of storage:
- Thin Provisioned: you only use the space your VM has filled with data.
- Thick Provisioned: you use the space of your VMs disk(s) size.
In addition to this, storage can be either local or shared between hosts of a pool.
There are storage types that are officially supported, and others that are provided as-is, in the hope that they are useful to you. Actually, we do maintain them too, but they receive less testing than the officially supported ones.
| Type of Storage Repository | Name | Thin Provisioned | Shared Storage | Officially Supported |
|---|---|---|---|---|
| file based | Local EXT | X | X | |
| Software RAID | X | No. Provided as-is | ||
| NFS | X | X | X | |
| File | X | X (use with caution) | ||
| XOSTOR | X | X | X | |
| ZFS | X | No. Provided as-is | ||
| XFS | X | No. Provided as-is | ||
| GlusterFS | X | X | No. Provided as-is | |
| CephFS | X | X | No. Provided as-is | |
| MooseFS | X | X | No. Provided as-is | |
| block based | Local LVM | X | ||
| iSCSI | X | X | ||
| HBA | X | X | ||
| Ceph iSCSI gateway | X | No. Provided as-is | ||
| CephRBD | X | No. Provided as-is |
Cost of thick provisioning is relatively high when you do snapshots (used for backup). If you can use a thin provisioned storage instead, such as Local EXT or NFS, you'll save a LOT of space.
Local
A local SR is using a disk or a partition of your local disk, to create a space for your VM disks. Local LVM will use logical volumes, whereas Local EXT will create an ext4 filesystem and put .vhd files in it.
The concept is simple: tell XCP-ng which disk or partition you want to use, and it will do everything for you! Don't do anything yourself (no need to create a logical volume or a filesystem).
As XCP-ng will handle everything for you, be aware that the device or partition will be formatted.
- Don't create a SR over a device or partition that contains important data.
- If you want to attach an existing SR to your pool, don't create a new local SR over it, else your virtual disks will be deleted. Instead, use the
xe sr-introducecommand. Further explanation can be found in the official XenServer documentation: https://support.citrix.com/external/article?articleUrl=CTX121896-how-to-introduce-a-local-storage-repository-in-xenserver
In Xen Orchestra:
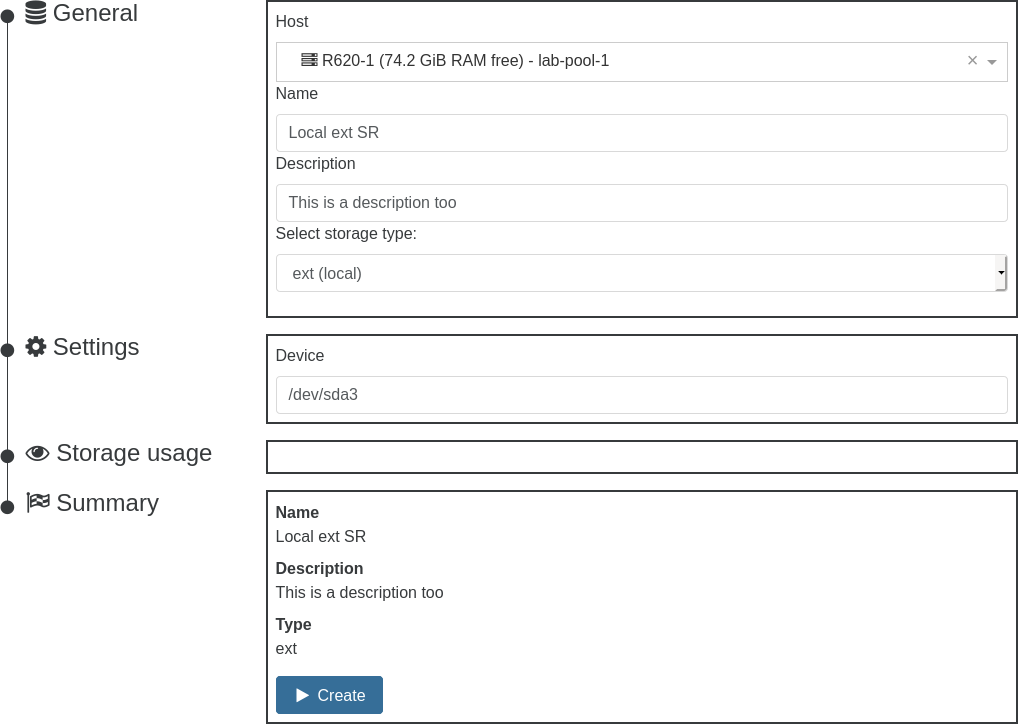
Via xe CLI for a local EXT SR (where sdaX is a partition, but it can be the entire device e.g. sdc):
xe sr-create host-uuid=<host UUID> type=ext content-type=user name-label="Local Ext" device-config:device=/dev/sdaX
In addition to the two main, rock-solid, local storages (EXT and LVM), XCP-ng offers storage drivers for other types of local storage (ZFS, XFS, etc.).
Software RAID
Local, with mdadm. Not recommended.
See our community-contributed guide.
We strongly recommend using a hardware RAID system instead of software RAID.
Software RAID storage integration is offered as-is and does not come with official support.
We do not provide support for issues resulting from the choice of software RAID for storage repositories.
NFS
Shared, thin-provisioned storage. Efficient, recommended for ease of maintenance and space savings.
In Xen Orchestra, go in the "New" menu entry, then Storage, and select NFS. Follow instructions from there.
Your host will mount the top-level NFS share you provide initially (example: /share/xen), then create folder(s) inside of that, then mount those directly instead (example: /share/xen/515982ab-476e-17b7-0e61-e68fef8d7d31). This means your NFS server or appliance must be set to allow sub-directory mounts, or adding the SR will fail. In FreeNAS or TrueNAS, this checkbox is called "All dirs" in the NFS share properties.
File
Local, thin-provisioned. Not recommended.
The file storage driver allows you to use any local directory as storage.
Example:
xe sr-create host-uuid=<host UUID> type=file content-type=user name-label="Local File SR" device-config:location=/path/to/storage
Avoid using it with mountpoints for remote storage: if for some reason the filesystem is not mounted when the SR is scanned for virtual disks, the file driver will believe that the SR is empty and drop all VDI metadata for that storage.
XOSTOR
Shared, thin-provisioned storage.
XOSTOR is an hyperconvergence solution. In short, your local storage are combined into a big shared storage.
The detailed documentation is available on this dedicated page.
ZFS
ZFS storage integration is offered as-is and does not come with official support.
Local, thin-provisioned. Available since XCP-ng 8.2.
Additional package required and available in our repositories: zfs.
Then either reboot or run modprobe -v zfs to load the kernel module.
Due to the variety of parameters of ZFS, the SR driver does not automate everything. You need to create your ZFS pool and volumes yourself, e.g. on partition sda4:
zpool create -o ashift=12 -m /mnt/zfs tank /dev/sda4
zfs create tank/zfssr
Now you can create the SR on top of it:
xe sr-create host-uuid=<HOST_UUID> type=zfs content-type=user name-label=LocalZFS device-config:location=/mnt/zfs/zfssr
Please report any problems (performance or otherwise) you might encounter with ZFS. Our forum is here for that!
Note: If you use ZFS, assign at least 16GB RAM to avoid swapping. ZFS (in standard configuration) uses half the Dom0 RAM as cache!
ZFS Knowledge & status
Feel free to look at these links for more advanced explanations:
- Wikipedia: https://en.wikipedia.org/wiki/ZFS
- OpenZFS Basics: https://www.youtube.com/watch?v=MsY-BafQgj4
You can monitor your ZFS pool using:
# Get the global status.
zpool status

# More info concerning the performance.
zpool iostat -v 1
ZFS module parameters
To get the list of supported parameters, you can execute:
man zfs-module-parameters
It's possible to write/read parameters on the fly. For example:
# Read zfs_txg_timeout param.
cat /sys/module/zfs/parameters/zfs_txg_timeout
5
# Write zfs_txg_timeout param.
echo 10 > /sys/module/zfs/parameters/zfs_txg_timeout
Better performance (advanced options)
There are many options to increase the performance of ZFS SRs:
- Modify the module parameter
zfs_txg_timeout: Flush dirty data to disk at least every N seconds (maximum txg duration). By default 5. - Disable sync to disk:
zfs set sync=disabled tank/zfssr - Turn on compression (it's cheap but effective):
zfs set compress=lz4 tank/zfssr - Disable accesstime log:
zfs set atime=off tank/zfssr
Check ZFS documentation to understand the pros and cons of each optimization.
XFS
XFS storage integration is offered as-is and does not come with official support.
Local, thin-provisioned storage.
Additional package required and available in our repositories: xfsprogs.
Works in the same way as the Local EXT storage driver: you hand it a device and it will format it and prepare it for your VMs automatically.
Via xe CLI for a local XFS SR (where sdaX is a partition, but it can be the entire device e.g. sdc):
xe sr-create host-uuid=<host UUID> type=xfs content-type=user name-label="Local XFS" device-config:device=/dev/sdaX
Glusterfs
Shared, thin-provisioned storage. Available since XCP-ng 8.2.
Glusterfs storage integration is offered as-is and does not come with official support.
Additional package required and available in our repositories: glusterfs-server.
You can use this driver to connect to an existing Gluster storage volume and configure it as a shared SR for all your hosts in the pool. For example, a Gluster storage with 3 nodes (192.168.1.11, 192.168.1.12 and 192.168.1.13) and a volume name called glustervolume will be thin provisioned with the command:
xe sr-create content-type=user type=glusterfs name-label=GlusterSharedStorage shared=true device-config:server=192.168.1.11:/glustervolume device-config:backupservers=192.168.1.12:192.168.1.13
CephFS
Shared, thin-provisioned storage. Available since XCP-ng 8.2.
- CephFS storage integration is offered as-is and does not come with official support.
- This way of using Ceph requires installing
ceph-commoninside dom0 from outside the official XCP-ng repositories. It is reported to be working by some users, but isn't recommended officially (see Additional packages). You will also need to be careful about system updates and upgrades.
You can use this driver to connect to an existing Ceph storage filesystem, and configure it as a shared SR for all your hosts in the pool. This driver uses mount.ceph from ceph-common package of centos-release-ceph-nautilus repo. So user needs to install it before creating the SR. Without it, the SR creation would fail with an error like below
Error code: SR_BACKEND_FAILURE_47
Error parameters: , The SR is not available [opterr=ceph is not installed],
Since most of the Centos repositories have been deprecated, you need to add the Vault repository before installing.
# nano /etc/yum.repos.d/CentOS-Vault.repo

# Vault
[Vault-base]
name=Vault - CentOS-$releasever - Base
baseurl=http://vault.centos.org/centos/$releasever/os/$basearch/
enabled=0
gpgcheck=1
gpgkey=file:///etc/pki/rpm-gpg/RPM-GPG-KEY-CentOS-$releasever

[Vault-updates]
name=Vault - CentOS-$releasever - Updates
baseurl=http://vault.centos.org/centos/$releasever/updates/$basearch/
enabled=0
gpgcheck=1
gpgkey=file:///etc/pki/rpm-gpg/RPM-GPG-KEY-CentOS-$releasever

[Vault-extras]
name=Vault - CentOS-$releasever - Extras
baseurl=http://vault.centos.org/centos/$releasever/extras/$basearch/
enabled=0
gpgcheck=1
gpgkey=file:///etc/pki/rpm-gpg/RPM-GPG-KEY-CentOS-$releasever
After that follow installation steps
yum install centos-release-ceph-nautilus --enablerepo=Vault-extras
yum-config-manager --disable centos-nfs-ganesha28 centos-ceph-nautilus
# Fix the repo file so that it points at vault.centos.org
sed -i -e '/^mirrorlist=/d' /etc/yum.repos.d/CentOS-Ceph-Nautilus.repo
sed -i -e 's/#baseurl=/baseurl=/' /etc/yum.repos.d/CentOS-Ceph-Nautilus.repo
sed -i -e 's/mirror\.centos\.org/vault.centos.org/' /etc/yum.repos.d/CentOS-Ceph-Nautilus.repo
# install
yum install ceph-common --enablerepo=centos-ceph-nautilus,Vault-base
Create /etc/ceph/admin.secret with your access secret for CephFS.
# cat /etc/ceph/admin.secret
AQBX21dfVMJtBhAA2qthmLyp7Wxz+T5YgoxzeQ==
Now you can create the SR where server is your mon ip.
# xe sr-create type=cephfs name-label=ceph device-config:server=172.16.10.10 device-config:serverpath=/xcpsr device-config:options=name=admin,secretfile=/etc/ceph/admin.secret
- For
serverpathit would be good idea to use an empty folder from the CephFS instead of/. - You may specify
serverportoption if you are using any other port than 6789. - Do not use admin keyring for production, but make a separate key with only necessary privileges https://docs.ceph.com/en/latest/rados/operations/user-management/
MooseFS
Shared, thin-provisioned storage. Available since XCP-ng 8.2.
MooseFS is a fault-tolerant, highly available, highly performing, scaling-out, network distributed file system. It is POSIX compliant and acts like any other Unix-like file system. SR driver was contributed directly by MooseFS Development Team.
- MooseFS storage integration is provided as-is and does not come with official support.
- The MooseFS client is not included with XCP-ng, so it must be installed on dom0 from the official MooseFS repository.
- By default, the MooseFS repository will be set as enabled. This means that any system update will also update the MooseFS client. Please, consider disabling the repository after installation.
Installation steps
curl "https://ppa.moosefs.com/RPM-GPG-KEY-MooseFS" > /etc/pki/rpm-gpg/RPM-GPG-KEY-MooseFS
curl "http://ppa.moosefs.com/MooseFS-3-el7.repo" > /etc/yum.repos.d/MooseFS.repo
yum install moosefs-client
- By default, the
moosefsstorage driver is not enabled and must be whitelisted in XAPI's configuration. - The list of accepted storage drivers is defined in
/etc/xapi.confbut we must never modify this file directly. Instead, copy thesm-pluginsdefinition from it, addmoosefsto the line, and write the resulting line to a new/etc/xapi.conf.d/99-enable-moosefs.conffile. - ⚠️ XAPI only takes the last definition of
sm-pluginsit reads into account. Files are read in alphabetical order. If there's already a configuration file in/etc/xapi.conf.d(to enable another additional storage driver), take it into consideration when you write your new definition ofsm-plugins.
Now when the MooseFS client is installed you can connect to an existing MooseFS cluster and create a shared SR for all hosts in the pool.
# xe sr-create type=moosefs name-label=MooseFS-SR content-type=user shared=True device-config:masterhost=mfsmaster.host.name device-config:masterport=9421 device-config:rootpath=/xcp-ng
Basically, to connect the driver to our cluster we have to know two parameters:
- masterhost - MooseFS master host name or IP, default mfsmaster
- masterport - MooseFS master port, default 9421
We also suggest to use a folder on the MooseFS cluster as a root path rather than using the direct path of the cluster.
iSCSI
Shared, thick-provisioned storage.
For an iSCSI multipath configuration, please follow these steps first.
In Xen Orchestra, go in the "New" menu entry, then Storage, and select iSCSI. Follow instructions from there.
HBA
Shared, thick-provisioned storage.
For a Fibre Channel multipath configuration, please follow these steps first.
You can add a Host Bus Adapter (HBA) storage device with xe:
xe sr-create content-type=user shared=true type=lvmohba name-label=MyHBAStorage device-config:SCSIid=<the SCSI id>
This is great for passing through full hardware disks, such as an entire hard disk.
If you have a problem with the SCSIid, you can use this alternative, carefully selecting the right drive, and checking it's visible on all hosts with the same name:
xe sr-create content-type=user shared=true type=lvmohba name-label=MyHBAStorage device-config:device=/dev/<HBA drive>
Ceph iSCSI gateway
Experimental - This needs reliable testing to ensure no block corruption happens in regular use. No official support is provided.
This is at this moment the only way to connect to Ceph with no modifications of dom0, it's possible to create multiple Ceph iSCSI gateways following this: https://docs.ceph.com/docs/master/rbd/iscsi-target-cli/
Ceph iSCSI gateway node(s) sits outside dom0, probably another Virtual or Physical machine. The packages referred in the URL are to be installed on iSCSI gateway node(s). For XCP-ng dom0, no modifications are needed as it would use LVMoISCSISR (lvmoiscsi) driver to access the iSCSI LUN presented by these gateways.
For some reason the chap authentication between gwcli and XCP-ng doesn't seem to be working, so it's recommended to disable it (in case you use no authentication a dedicated network for storage should be used to ensure some security).
IMPORTANT: User had many weird glitches with iSCSI connection via ceph gateway in lab setup (3 gateways and 3 paths on each host) after several days of using it. So please keep in mind that this setup is experimental and unstable. This would have to be retested on recent XCP-ng.
Ceph RBD
- Ceph RBD storage integration is provided as-is and does not come with official support.
- This way of using Ceph requires installing
ceph-commoninside dom0 from outside the official XCP-ng repositories. It is reported to be working by some users, but isn't recommended officially (see Additional packages). You will also need to be careful about system updates and upgrades.
You can use this to connect to an existing Ceph storage over RBD, and configure it as a shared SR for all your hosts in the pool. This driver uses LVM (lvm) as generic driver and expects that the Ceph RBD volume is already connected to one or more hosts.
Known issue: this SR is not allowed to be used for HA state metadata due to LVM backend restrictions within XAPI drivers, so if you want to use HA, you will need to create another type of storage for HA metadata
Since most of the Centos repositories have been deprecated, you need to add the Vault repository before installing.
# nano /etc/yum.repos.d/CentOS-Vault.repo

# Vault
[Vault-base]
name=Vault - CentOS-$releasever - Base
baseurl=http://vault.centos.org/centos/$releasever/os/$basearch/
enabled=0
gpgcheck=1
gpgkey=file:///etc/pki/rpm-gpg/RPM-GPG-KEY-CentOS-$releasever

[Vault-updates]
name=Vault - CentOS-$releasever - Updates
baseurl=http://vault.centos.org/centos/$releasever/updates/$basearch/
enabled=0
gpgcheck=1
gpgkey=file:///etc/pki/rpm-gpg/RPM-GPG-KEY-CentOS-$releasever

[Vault-extras]
name=Vault - CentOS-$releasever - Extras
baseurl=http://vault.centos.org/centos/$releasever/extras/$basearch/
enabled=0
gpgcheck=1
gpgkey=file:///etc/pki/rpm-gpg/RPM-GPG-KEY-CentOS-$releasever
After that follow installation steps
yum install centos-release-ceph-nautilus --enablerepo=Vault-extras
yum-config-manager --disable centos-nfs-ganesha28 centos-ceph-nautilus
# Fix the repo file so that it points at vault.centos.org
sed -i -e '/^mirrorlist=/d' /etc/yum.repos.d/CentOS-Ceph-Nautilus.repo
sed -i -e 's/#baseurl=/baseurl=/' /etc/yum.repos.d/CentOS-Ceph-Nautilus.repo
sed -i -e 's/mirror\.centos\.org/vault.centos.org/' /etc/yum.repos.d/CentOS-Ceph-Nautilus.repo
# install
yum install ceph-common --enablerepo=centos-ceph-nautilus,Vault-base
Create /etc/ceph/keyring with your access secret for Ceph.
# cat /etc/ceph/keyring
[client.admin]
key = YOUR-SECRET-KEY
Create /etc/ceph/ceph.conf as your matching setup.
# cat /etc/ceph/ceph.conf
[global]
mon_host = mon-ip-1:6789,mon-ip-2:6789,mon-ip-3:6789

[client.admin]
keyring = /etc/ceph/keyring
Create the RBD image.
rbd create --size 300G --image-feature layering pool/xen1
Mount the RBD image on your host.
# Map it to all xen hosts in your pool
rbd map pool/xen1
To automatically mount the RBD image, you can configure the /etc/rbdmap ( see RBDMap documentation ) as follows:
cat /etc/ceph/rbdmap
# RbdDevice		Parameters
pool/xen1
And then, enable the rbdmap service to mount automatically the image at boot.
systemctl enable --now rbdmap
The CEPH RBD SR is built on top of an LVM Block device (your RBD image). You need to adapt the LVM configuration in order to be able to detect the newly created LVM VG created by XCP-NG.
You need to place this devices configuration for both:
- /etc/lvm/lvmlocal.conf
- /etc/lvm/master/lvmlocal.conf
...
devices {
	types = [ "scini", 16, "rbd", 1024 ]
	scan = [ "/dev/disk/by-id", "/dev/rbd" ]
}
...
This configuration must be re-applied after each XCP-NG Upgrade / reinstall.
Updates should not affect the LVM configuration.
Create the CephRBD SR.
# create a shared LVM
xe sr-create name-label='CEPH' shared=true device-config:device=/dev/rbd/rbd/xen1 type=lvm content-type=user
You will probably want to configure ceph further so that the block device is mapped on reboot.
For the full discussion about Ceph in XCP-ng, see this forum thread: https://xcp-ng.org/forum/topic/4/ceph-on-xcp-ng
- Do not use admin keyring for production, but make a separate key with only necessary privileges https://docs.ceph.com/en/latest/rados/operations/user-management/
LargeBlock SR
Largeblock SR is a workaround for 4KiB disks not working on VDI creation with normal SR types.
To create a LargeBlock SR, the same parameters needed for a EXT SR are needed with the SR type changed to largeblock.
xe sr-create host-uuid=<host UUID> type=largeblock content-type=user name-label="Local largeblock" device-config:device=/dev/sdaX
The largeblock SR creates a translation layer to align the device on 512 sector size using a loop device and creates a EXT SR on this emulated device. It's needed to work around an issue with VHD alignment that creates an error on VHD creation on the native 4KiB device.
💿 ISO SR
You might be wondering how to upload an ISO. Unlike other solutions, you need to create a dedicated "space" for these, a specific ISO SR. To create an ISO SR, you have 2 possibilities:
- Shared: A shared ISO SR is on a VM or on a dedicated storage server. It's accessible with an IP address, like 192.168.1.100 via SMB or NFS.
- Local (not recommended for production): A local ISO SR is a directory created directly on the dom0 host. It's only accessible on the host where the directory was created.
Create a Shared ISO SR
First, you need to create the NFS or SMB Share. There are plenty of options: from dedicated NAS hardware solutions and dedicated software solutions such as TrueNAS, to manual administration on any Linux/unix or Windows system.
You can find some tutorials on the internet to create an NFS Server, for exemple here https://wiki.linux-nfs.org/wiki/index.php/NFS_Howto or here https://wiki.archlinux.org/title/NFS
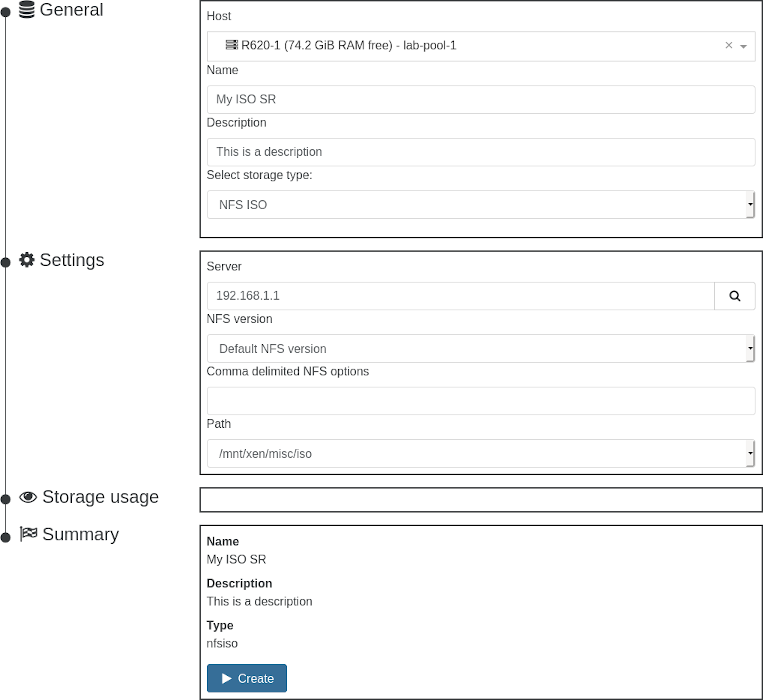
Then, in Xen Orchestra go into "New/Storage" and select "ISO SR":
Create a Local ISO SR
From the CLI:
- Create a directory on the local filesystem to storage your ISOs
- Copy/move ISOs to this new location
- Create the ISO SR using xe sr-create
- You can add or update ISOs later by placing them into the directory you created in step 1
- Rescan the SR if you change the files stored in the ISO directory
Here's an example of how to create a Local ISO SR named "ISO Repository" that will be stored in /opt/var/iso_repository:
mkdir -p /opt/var/iso_repository

xe sr-create name-label="ISO Repository" type=iso device-config:location=/opt/var/iso_repository device-config:legacy_mode=true content-type=iso
a6732eb5-9129-27a7-5e4a-8784ac45df27 # this is the output

xe sr-scan uuid=a6732eb5-9129-27a7-5e4a-8784ac45df27
If your host is in a pool of several hosts, you need to add the host-uuid parameter to the xe sr-create command above. You can retrieve the host UUID with xe host-list.
You can then upload your ISO in /opt/var/iso_repository/
On Xen Orchestra, go into "New/Storage" and select "ISO SR"
- Select "Local" instead of NFS/SMB
- Enter the path created before
- Upload ISOs on your host to the same path

A local ISO SR will only be available on the host where it was created. Also, the dom0 filesystem is small with only about 15gb of space free for extra storage!
That's it!
Don't forget to rescan your SR after adding, changing, or deleting ISO files. Rescan is done automatically every 10 minutes otherwise.
📡 Storage API
Current storage stack on XCP-ng is called SMAPIv1. The VHD format is used, which has a maximum file size limitation of 2TiB. This means that when using this format your VM disk can't be larger than 2TiB.
Why use VHD format?
Mostly for historical reasons. When standardization on VHD was decided, it was the only acceptable format that supported copy on write, delta capabilities, and merge possibilities. Thanks to VHD format, you have:
- snapshot support
- delta backup
- fast clone VM
- live storage migration
Using RAW format
Alternatively, you can decide to use a disk without 2TiB limitation, thanks to RAW format. However, the price to pay is to lose all VHD features.
To create a large VDI on a file based SR, it's trivial, for example:
xe vdi-create type=user sm-config:type=raw virtual-size=5TiB sr-uuid=<SR_UUID> name-label=test
On a block based storage, it's a bit more complicated:
- Create a small disk first:
xe vdi-create type=user sm-config:type=raw virtual-size=1GiB sr-uuid=<SR_UUID> name-label=test - Extend it with
lvextend -L+5T /dev/VG_<whateverUUID>/LV-<VDI_UUID> - Rescan SR
You won't be able to live migrate storage on this disk or snapshot it anymore. Outside of this, it will work very well.
SMAPIv3: the future
SMAPIv1 is the historical storage interface, and now a big spaghetti monster. That's why Citrix decided to create a new one, called SMAPIv3: it's far more flexible, and also support (partially) the qcow2 format. This format has the same concepts as VHD, but without its limitations.
Also, the storage API is far more agnostic and the code is better. So what's the catch? Problem is there's no Open Source implementation of SMAPIv3, also the current API state isn't really complete (doesn't support a lot of features). However, XCP-ng team is working on it too, because it's clearly the future!
🪄 Coalesce
Coalesce process is an operation happening in your hosts as soon a snapshot is removed.
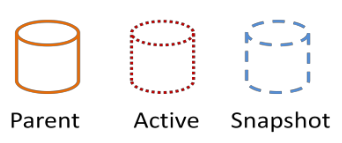
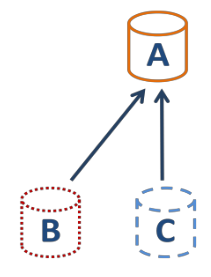
When you make a snapshot, a "base copy" is created (in read only), the "active" disk will live its own life, same for the freshly created snapshot. Example here: A is the parent, B the current/active disk and C is the snapshot:
That's OK. But what about creating a new snapshot on B after some data are written?
You got this:
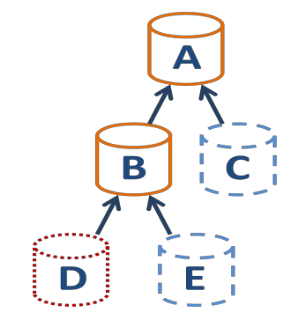
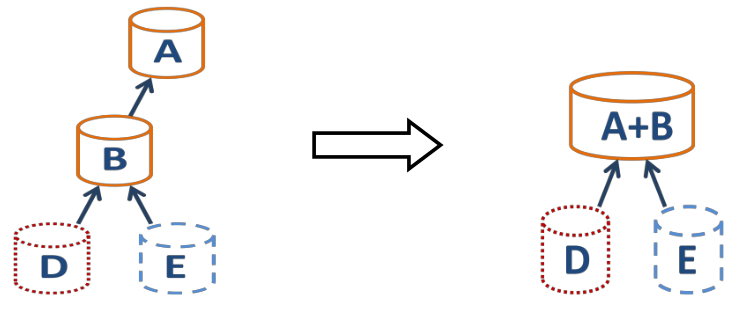
When you make XO backup on regular basis, old/unused snapshots will be removed automatically. This will also happen if you create/delete snapshots manually. So in our case, C will disappear. And without this snapshot, XCP-ng will coalesce A and B:
This process will take some time to finish (especially if you VM stays up and worst if you have a lot of writes on its disks).
What about creating snapshot (ie call backup jobs) faster than XCP-ng can coalesce? Well, the chain will continue to grow. And more you have disks to merge, longer it will take.
You will hit a wall, 2 options here:
- if your VM disks are small enough, you could reach the max chain length (30).
- if your VM disks are big, you'll hit the SR space limit before.
Xen Orchestra protection
Luckily, Xen Orchestra is able to detect an uncoalesced chain. It means it won't trigger a backup job for a VM if its disks are not coalesced yet: it will be skipped.
But more than that, Xen Orchestra is also able to show you uncoalesced disk in the SR view, in the Advanced tab.
More about this exclusive feature on https://xen-orchestra.com/blog/xenserver-coalesce-detection-in-xen-orchestra/
🦮 How to modify an existing SR connection
The link between a host and an SR is called the PBD. A PBD basically stores how to access a storage repository (like the path to the drive or to an NFS share).
If you want to change how an SR is accessed (for example, if your NFS SR changed its IP), you must destroy and recreate the PBD with the new values. Let's use our example where an NFS SR has changed to a new IP:
- Double check you don't have running VMs on this SR. This is crucial as this operation cannot be performed live.
- Get the SR UUID (in XO, SR view, click on your NFS SR, the UUID is visible then)
- On your host console/terminal, find all the
PBDUUIDs for this SR:xe sr-param-get param-name=PBDs uuid=<SR UUID> - For each
PBDUUID, runxe pbd-param-list uuid=<PBD UUID>and copy the output to a text editor so you have them "saved" elsewhere. Each record has the host UUID and SR UUID, which will be needed to recreate them. It will also contain thedevice-config, which is required to indicate how to access it (the NFS path). - Now you need to edit this
device-configfield with the new values. In our example, I will change mydevice-configfromserverpath: /mnt/xen; server: 192.168.1.2toserverpath: /mnt/xen; server: 192.168.1.5to reflect the new NFS IP. Have this text ready for the next commands. - Remove each of these old PBDs with
xe pbd-destroy uuid=<PBD UUID>. - Recreate each of them using your new
device-config, for example here:xe pbd-create host-uuid=<HOST UUID> sr-uuid=<SR UUID> device-config:server=192.168.1.5 device-config:serverpath=/mnt/xen. Note the new IP address entered vs the previous PBD configuration. - When you're done and all PBDs are recreated, you can reconnect (in XO, SR view, "reconnect to all hosts" or do a
xe pbd-plug uuid=<PBD UUIDfor each of them). Once reconnected, you can start your VMs as if nothing happened.