Windows Guest Tools
Common issues and topics related to Windows Guest Tools.
Not all PV drivers are correctly installed
Cause
It's possible that some antivirus blocks the end of the installation of the PV drivers. We've seen this happening with SentinelOne AV already (see this thread).
Solution
Simply pausing the agent and rebooting will allow the PV drivers to install successfully. After a successful installation, enabling the SentinelOne agent again is possible without any other issues regarding the tools or drivers.
Low storage performance on Windows
Cause
Virtual disks on Windows VMs may perform poorly if the system power profile is not set to Performance.
Workaround
As reported by nesting4lyfe2024, marcoi and wiseowl on the XCP-ng forum (link).
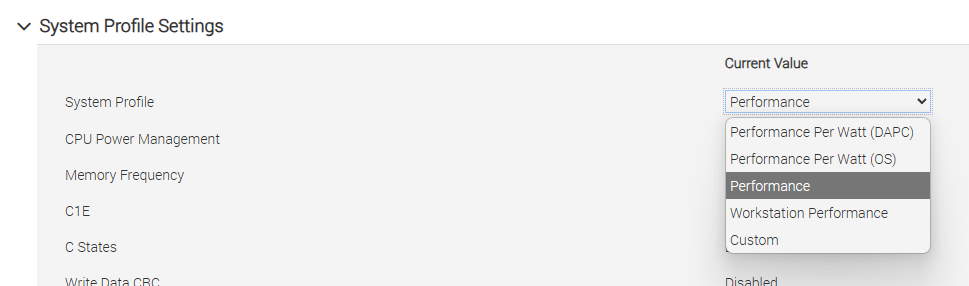
Set your BIOS power profile to "Performance" or "Performance Per Watt (OS)". Consult your motherboard manual for details; for example, on Dell systems with iDRAC Enterprise, this setting may be found at Configuration - BIOS Settings - System Profile Settings - System Profile:
Windows fails to boot (hangs, INACCESSIBLE_BOOT_DEVICE)
In some situations (failed uninstallation, major Windows version upgrades), Xen PV drivers (whether Citrix or XCP-ng) may cause Windows to fail to start (hanging at boot, BSOD with Stop code INACCESSIBLE_BOOT_DEVICE).
The XenBootFix utility included with XCP-ng Windows Guest Tools 9.0 and above helps you disable any active Xen PV drivers and get your system to a bootable state before running XenClean.
The utility only runs in Windows Preinstallation Environment (PE) or Windows Recovery Environment (RE). It will not run from Safe Mode.
Below is a procedure for using XenBootFix to recover a non-booting VM:
- Take a snapshot of your VM in case uninstallation fails.
- Disable the "Manage Citrix PV drivers via Windows Update" option on your VM if it's enabled.
- Boot into Windows PE or Windows RE in command line-only mode. There are a few ways to accomplish this:
- If your Windows installation BSODs on boot multiple times, it will automatically boot into Windows RE. Choose Troubleshoot - Command Prompt.
- When running Windows Server, press F8 before Windows starts, then choose Repair Your Computer. Choose Troubleshoot - Command Prompt.
- Boot your VM using a Windows Setup or Windows PE CD image. If you don't see a command line, press Shift+F10.
- Identify your Windows installation drive letter.
- Use the
dircommand to list files in a given drive letter. For example:dir C:\(the backslash is required) - In some cases, your Windows partition should already be mounted. Try the first few letters (
C:,D:,E:). - If you cannot find your Windows drive letter, you may need to assign a new drive letter with Diskpart.
- Type
diskpartat the command line. The command prompt should change toDISKPART> - Type
list volthen make a note of your Windows partition and its drive letter (if any). - If your Windows partition does not have a drive letter, type
sel vol NwhereNis the volume number shown in Diskpart, then typeassign letter=W. Your Windows partition will be assigned the drive letterW:. - Finally, at the
DISKPART>prompt, typeexitto exit Diskpart.
- Type
- Obtain XenBootFix.
- The easiest way is to download and use the latest release ISO of XCP-ng Windows Guest Tools, which includes a copy of XenBootFix at
package\XenBootFix\XenBootFix.exe. - If you're using XCP-ng Windows Guest Tools 9.0 or later, it is also located at
W:\Program Files\XCP-ng\Windows PV Drivers\XenBootFix\XenBootFix.exewhereW:is your Windows drive letter. - Note: If using Windows PE, do not remove its CD image when it's running. You may encounter unexpected errors otherwise.
- Run the command
<path to XenBootFix.exe> W:\WindowswhereW:is your Windows drive letter.
- Note: Make sure the drive letter belongs to your actual Windows installation and not Windows PE/RE. By default, Windows PE/RE use the drive letter X:.
- Type
exitto close Command Prompt. If using Windows RE, choose Continue to boot into Windows. Windows should now start normally. - You must immediately run XenClean from within Windows to remove the remaining Xen drivers. See instructions above.
Connecting to guests using serial console
In some situations, you might want to expose a VM's serial console to network for troubleshooting purposes (e.g. Windows kernel debugging). You can use the following procedure:
- Shut down the VM.
- On your host, run the following command:
xe vm-param-set uuid=<uuid> platform:hvm_serial=tcp::<port>,server,nodelay,nowaitwhere<uuid>is the VM's UUID and<port>is the TCP port on the host that exposes the VM's serial port, e.g. 7001. - You need to open the selected port on the host's firewall:
/etc/xapi.d/plugins/firewall-port open 7001- Note that any host running the VM will need this command.
- Connecting to port 7001 on the host will connect to your VM's serial port. You can use Telnet, PuTTY or any similar tools.
- To configure kernel debugging on Windows, disable Secure Boot and BitLocker then run the following commands within the VM:
Connect using WinDbg using the
bcdedit /debug on
bcdedit /dbgsettings serial debugport:1 baudrate:115200Attach to kerneloption with a connection string:com:ipport=7001,port=<host IP> - To undo the changes and remove the serial setting, use
xe vm-param-remove uuid=<uuid> param-name=platform param-key=hvm_serial
BSOD 0x3B (SYSTEM_SERVICE_EXCEPTION) on newer Intel CPUs
Cause
Intel CPUs codenamed Rocket Lake, Sapphire Rapids and newer provide the Architectural LBR feature, which Windows depends on. Xen's support of this CPU feature is incomplete, which causes Windows to crash when using certain applications (e.g. Blue Iris: forum link, GitHub issue).
Workaround
Stop the VM, run the following command on the host then restart the VM:
xe vm-param-add uuid=<VM's UUID> param-name=platform msr-relaxed=true
Windows fails to boot after updating
Cause
This is often caused by the Windows boot loader failing to find the Windows partition.
Workaround
From the recovery menu, open Command Prompt. If C: is the path to your Windows partition, run the following command:
bcdboot C:\Windows
After exiting to Windows, your system should boot successfully.
Windows Server 2019 crashes on AMD Zen without BSOD
First, try disabling Viridian from Xen Orchestra. Note that this value may reset itself after reboot.
If this fixes the problem, remove the Registry value Enabled at HKLM\SYSTEM\CurrentControlSet\Control\DeviceGuard\Scenarios\SystemGuard and reboot.
You can now enable Viridian again for better VM performance.
Data drives showing as removable in Windows
Follow the instructions in the Citrix KB entry CTX583997: In XenServer, fixed data drives show as removable data drives to BitLocker.
To summarize, first set the following registry keys in your VMs:
HKLM\System\CurrentControlSet\Services\XenBus\Parameters\VBD\AllowPdoRemove = 0
HKLM\System\CurrentControlSet\Services\XenBus\Parameters\VBD\AllowPdoEject = 0
Next, set each VBD's property to non-unpluggable:
xe vbd-param-set uuid=<vbd-uuid> unpluggable=false
Windows PV NICs losing IP after driver upgrade
This is a known issue when updating XenServer VM Tools from versions older than 9.3.3.
Refer to Citrix KB entry CTX678047: Static IP loss when updating to VM Tools for Windows 9.3.3 or earlier.
Future updates from XenServer VM Tools 9.3.3 to a later version will not encounter this issue.
XenServer VM Tools not upgrading drivers after installation
This can be due to the "Manage Citrix PV drivers via Windows Update" feature being enabled on that VM.
If this feature is enabled, XenServer VM Tools will automatically uncheck the "Install I/O Drivers Now" checkbox and defer the driver update to Windows Update.
Make sure to either check this checkbox, specify ALLOWDRIVERINSTALL=YES on the Msiexec command line (if installing via command line) or install driver updates via Windows Update.
XenServer drivers not receiving updates via Windows Update
Cause
This can be due to the "Manage Citrix PV drivers via Windows Update" option being enabled after installing matching drivers, which causes the PV Bus driver to lock onto the non-vendor device and prevent updates from coming in.
Diagnosis
First, check in Device Manager which PV Bus device is active, i.e. the one that contains child devices (use View - Devices by connection).
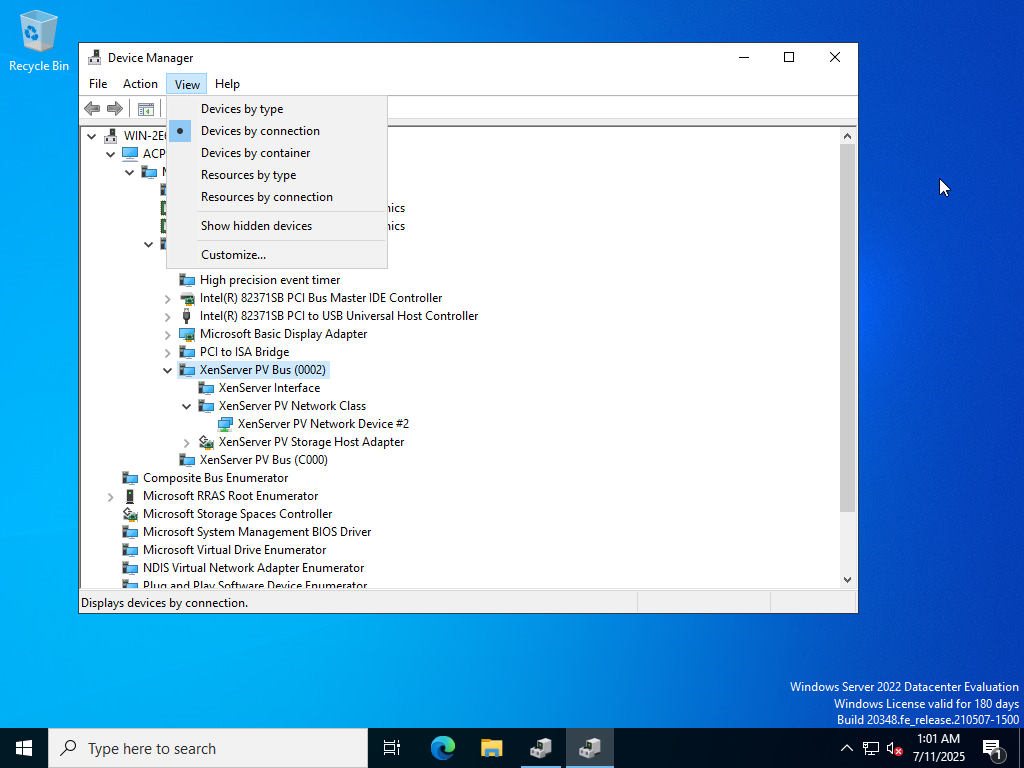
If either of the non-vendor devices ("0001" or "0002") is active then you can continue with fixing this issue.
You will see only one of "0001" or "0002", not both.
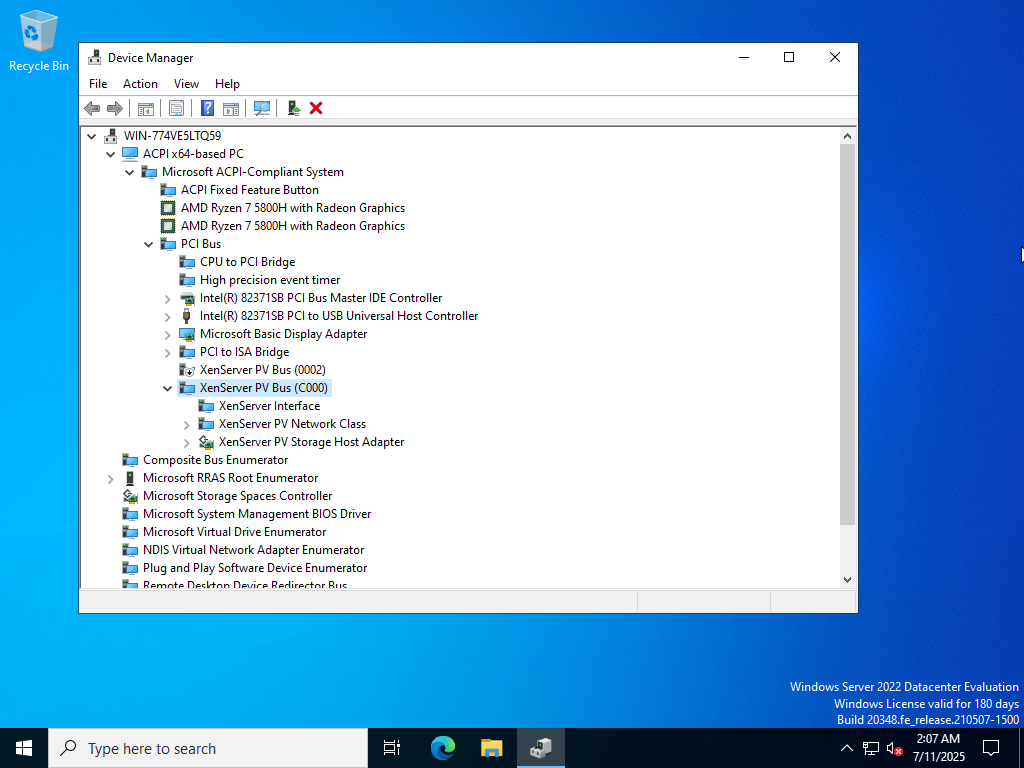
If the vendor device ("C000" in this example) is active then you don't have this problem. You should check your Windows Update settings instead.
Solution
XenClean fixes this situation. See the XenClean guide for instructions.
You will need to reinstall the management agent.
Windows Server 2025 hangs randomly with 0% CPU
Cause
This can be due to the Viridian synthetic timer feature being disabled on the guest.
Solution
First, check that Viridian extensions are all enabled on your VM. If you've set boot parameters to disable the synthetic timer, they need to be reverted:
bcdedit /deletevalue "{current}" useplatformclock
bcdedit /deletevalue "{current}" useplatformtick