Upgrade to a newer release
Discover how to upgrade from an older release.
We assume your goal is to get to a newer version of XCP-ng from a previous release, e.g. 8.0 to 8.2.1 or 8.2.1 to 8.3.
For updates that don't change the version numbers (bugfixes, security fixes), see the updates section.
There are 3 upgrade methods, detailed below:
- Using the installation ISO (recommended).
- Using the installation ISO when you can't boot from it: remote upgrade.
- From command line a.k.a. yum-style upgrade. ⚠️ Only for some point version upgrades.
For upgrading XCP-ng machines with an XOSTOR SR, please refer to this additional information before taking any action.
Release Notes & Known Issues
Read the Release Notes and Known Issues for every release that is higher than your current release. They may provide additional instructions for specific situations. Also please read the following warnings:
- Always upgrade and reboot the pool master FIRST
- DON'T use a
Maintenance Modefeature that moves the pool master to another host: this has to be avoided in the upgrade procedure. - If HA (High Availability) is enabled, disable it before upgrading.
- Eject CDs from your VMs before upgrading to avoid issues:
xe vm-cd-eject --multiple. - Read Handling alternate drivers or kernel if your host depends on them.
- Update your pool with the latest updates before upgrading, and reboot or restart the toolstack, depending on the nature of the installed updates.
- Install the latest updates after upgrading.
- When upgrading from XCP-ng 7.5 or lower or from XenServer or Citrix Hypervisor, it is very important to make sure clustering is not enabled on your pool. It's a functionality that relies on proprietary software and that is not available in XCP-ng, and having it enabled before the upgrade will lead to XAPI being unable to start due to unexpected data in the database. If it is enabled or you already upgraded, see this comment.
Upgrade via installation ISO (recommended)
This is the standard XCP-ng way. With this method, note that you can often skip intermediate releases (e.g. from 7.5 to 8.2 directly) without needing intermediate upgrade, but there are exceptions, so check the release notes! For example, we strongly advise to upgrade to XCP-ng 8.2.1 first before jumping to XCP-ng 8.3.
It will backup your system to the backup partition and reinstall the system from scratch on the system partition. Your XCP-ng configuration (VMs, storage repositories and so on) is retained.
Any additional changes made by you to the system will be lost, so remember to make them again after the upgrade. Including: kernel or Xen boot parameters, changes to /etc, additional users created and their homes, local ISO SRs, additional packages... Some boot parameters and configuration files are saved, but it's a short list.
Steps:
- Download an installation ISO from the download page. Choose either the standard installer or the network installer.
- Check the authenticity and the integrity of the downloaded ISO.
Then, for every host of the pool, starting with the pool master:
- Move all VMs off the host if your setup allows it, or turn them off.
- Follow the installation procedure on the installation page.
You must boot the ISO in the firmware mode that was used for initial installation: UEFI or BIOS. Otherwise, the installer won't detect the existing installation and offer to upgrade.
- When offered the choice, choose to upgrade your existing XCP-ng installation.
- After the upgrade completed, reboot your host.
- Install the updates that have been released after the installation ISO was created. They can fix bugs and/or security issues.
- Reboot.
Once upgraded, keep the system regularly updated (see the updates section).
If you can't boot from the ISO, see the next section.
Troubleshooting ISO upgrades
Using the installation ISO when you can't boot from it: remote upgrade
This is an alternate method if you can't boot from the installation ISO.
If you do not have access to your server or remote KVM in order to upgrade using the interactive ISO installer, you can initiate an automatic reboot and upgrade process using the following procedure, which replaces steps 4 to 6 in the above upgrade procedure.
- Unpack/extract the XCP-ng ISO to a folder on an HTTP server. Make sure not to miss the hidden .treeinfo file (common mistake if you
cpthe files with*). - Get the UUID of your host by running the below command:
xe host-list
- Using that host UUID, as well as the URL to the folder hosting the unpacked XCP-ng ISO, run the following command to test access:
The returned output must be true to continue.xe host-call-plugin plugin=prepare_host_upgrade.py host-uuid=750d9176-6468-4a08-8647-77a64c09093e fn=testUrl args:url=http://<ip-address>/xcp-ng/unpackedexample/
- Now tell the host to automatically boot to the ISO and upgrade itself on next reboot (using the UUID and URL from before):
The output should also be true. It has created a temporary entry in the grub bootloader which will automatically load the upgrade ISO on the next boot. It then automatically runs the XCP-ng upgrade with no user intervention required. It will also back up your existing XCP-ng dom0 installation to the secondary backup partition, just like the normal upgrade.xe host-call-plugin plugin=prepare_host_upgrade.py host-uuid=750d9176-6468-4a08-8647-77a64c09093e fn=main args:url=http://<ip-address>/xcp-ng/unpackedexample/
- To start the process, just tell the host to reboot. It is best to watch the progress by using KVM if it's available, but if not, it should proceed fine and boot into the upgraded XCP-ng in 10 to 20 minutes.
Note: it has been brought to our attention that a DHCP server may be necessary during the upgrade.
Once upgraded, keep the system regularly updated (see Updates Howto).
From command line
A.k.a. yum-style upgrade.
⚠️ Supported across some minor releases (e.g. from 8.0 to 8.2), but not all of them (always check the release notes), and not supported across major releases (e.g. from 7.6 to 8.0). ⚠️
This upgrade procedure is not supported to upgrade to XCP-ng 8.3.
This information about EOL releases is retained solely to assist with the transition to a supported release, for example an upgrade to 8.2.1 (now EOL) as an intermediary step towards release 8.3.
Though it's been successfully tested by numerous people, this method is still considered riskier than using the installation ISO:
- this upgrade method does not create a backup of your system, unlike an upgrade via the installation ISO, so there's no possible return to the previous version (unless reinstalling it from scratch and reconfiguring it).
- there are more things that can go wrong when you upgrade lots of packages one by one than when you reinstall from scratch (which is what the installation ISO does, without losing your data of course).
- additional packages installed by the user on the system from CentOS, EPEL or third party repositories can sometimes make the upgrade fail.
On the plus side, it's a lot faster provided you have a decent internet connection or a local mirror, and changes you have made to the host are retained.
Once upgraded, keep your system regularly updated (see Updates Howto) until the next upgrade.
Prerequisites
Access to the repository (obviously)
Your dom0 system must either have access to updates.xcp-ng.org, or to a local mirror. In the second case, make sure to update the baseurl values in /etc/yum.repos.d/xcp-ng.repo to make them point at the local mirror, and keep the mirror up to date, of course.
Be cautious with third party repositories and packages
If you have enabled third party repositories (CentOS, EPEL...) in the past, make sure to disable them before updating. Otherwise, core packages from your dom0 system can be overwritten with versions of packages that have not been tested in the context of XCP-ng, or lack specific patches.
Set enabled=0 in the relevant files in /etc/yum.repos.d/. Warning: when added, the EPEL repository is automatically enabled. Make sure to disable it right away and use this syntax instead to install anything from it: yum install packagename --enablerepo='epel'.
In any case, installing extra packages from outside the XCP-ng repositories can lead to various issues, including update or system upgrade problems, so make sure to:
- install only packages that are known not to have any adverse effect on XCP-ng (when in doubt, ask on the forum or check with your pro support);
- check the dependencies pulled by such packages: they must not overwrite existing packages in XCP-ng;
- know that you are doing it at your own risk and be prepared to fix any issues that would arise, especially unforeseen upgrade issues (we can't test upgrade scenarios where unknown packages are installed on the system).
More at Additional packages.
Precautions
The precautions that apply to regular updates also apply to the upgrade process.
Check them carefully.
Upgrade instructions
⚠️ Proceed one host at a time. Do not yum update all hosts at once to "save time". ⚠️
⚠️ ALWAYS START WITH THE POOL MASTER. ⚠️
Let's start: open a terminal to your XCP-ng server, as root.
0. Migrate the VMs to another host or shutdown or suspend them
1. Download and verify the yum .repo file
We will download the repository file that will tell yum where to download the packages from, and we will verify its authenticity and its integrity.
-
Define the target version, replacing X and Y as appropriate:
export VER=X.YExample:
export VER=8.2
In the commands below your shell will automatically replace $VER with the value that you defined.
- Download the files
# the repository filewget https://updates.xcp-ng.org/8/xcp-ng-$VER.repo -O xcp-ng-$VER.repo# sums and signatures to verify itwget https://updates.xcp-ng.org/8/SHA256SUMS -O SHA256SUMSwget https://updates.xcp-ng.org/8/SHA256SUMS.asc -O SHA256SUMS.asc
- Follow the steps to check the integrity and origin of the repository file (optional)
- Install the verified repository file so that yum uses it.
cp xcp-ng-$VER.repo /etc/yum.repos.d/xcp-ng.repo# help yum taking the change into account immediatelyyum clean metadata
2. Upgrade the system's packages
# yum update
3. Check the configuration files
When rpm needs to update configuration files that you had modified previously, there's a conflict of changes. There are two strategies:
- either keep your file and write the new configuration file as
yourfile.rpmnew. - or overwrite your file with the new one and save it as
yourfile.rpmsave.
For a given configuration file, only one of those can be created, depending on whether the RPM defines that it's more important to keep the user configuration or to put the new configuration in place. If you haven't made any change to the configuration file or the RPM does not bring any change during the update, then neither will be created.
So, after an upgrade using yum, you need to look for .rpmnew and .rpmsave files, update the related configuration files accordingly if needed, and delete those .rpmnew and .rpmsave files in order to keep things clean for when you will need to do this again after the next upgrade.
If you haven't modified configuration files that rpm wants to update, there will be nothing to do.
/!\ There is an exception: always ignore the /etc/cron.d/logrotate.cron.rpmsave file. Citrix team named that file this way so that it is ignored by cron. It is used only with legacy partitioning, where no /var/log partition exists, and triggers a very aggressive log rotation. Leave it alone.
# Find conflicting configuration files, excluding logrotate.cron.rpmsave
# find /etc ( -name "*.rpmnew" -or -name "*.rpmsave" ! -name "logrotate.cron.rpmsave" )
4. Reboot the host
Upgrade from XenServer
This article describes how to proceed in order to convert your Citrix XenServer infrastructure into an XCP-ng infrastructure.
This is exactly the same thing for any Citrix Hypervisor version.
Yes you can do that without losing ANY settings (SR, VMs, networks) from your existing Citrix Hypervisor/XenServer infrastructure!
- Always upgrade and reboot the pool master FIRST
- DON'T use a
Maintenance Modefeature that moves the pool master to another host: this has to be avoided in the upgrading procedure. - If HA (High Availability) is enabled, disable it before upgrading
- Eject CDs from your VMs before upgrading to avoid issues:
xe vm-cd-eject --multiple - It is very important to make sure clustering is not enabled on your pool. It's a functionality that relies on proprietary software and that is not available in XCP-ng, and having it enabled before the upgrade will lead to XAPI being unable to start due to unexpected data in the database. If it is enabled or you already upgraded, see this comment.
- If you already have an XCP-ng pool, do not try to add a slave running XenServer to it. You will get an "Incompatible License" error. Please upgrade the slave to XCP-ng first, then add it to your existing pool
- Before proceeding, it is important to ensure that the
xapiservice currently running on your host is compatible with the version provided by XCP-ng. To verify this, open a terminal session on the host machine and execute the commandrpm -qi xapi-core. This command will display detailed information about the installedxapi-corepackage, including its version number. Check the xapi version available in XCP-ng updates. Compatibility is essential because the XCP-ng installation ISO can only upgrade XenServer hosts whose xapi version is equal to or lower than the version included with XCP-ng. If your xapi version exceeds this, the upgrade process may not proceed correctly.
Before you start
- Please re-read carefully all the previous warnings
- Need a tool to manage your XCP-ng hosts? We strongly suggest that you use Xen Orchestra, the web UI for XCP-ng. Alternatively, you can use
xeCLI or XO Lite.
Migration process
XCP-ng installation follows roughly the same workflow as a XenServer installation. Therefore, the migration procedure will be very similar to an upgrade procedure in XenServer.
- Download the XCP-ng ISO from this XCP-ng website
- Follow the website instructions to put the ISO into a USB key or a CD
Then boot on the ISO!
You must boot the ISO in the firmware mode that was used for initial installation: UEFI or BIOS. Otherwise, the installer won't detect the existing XenServer installation and offer to upgrade.
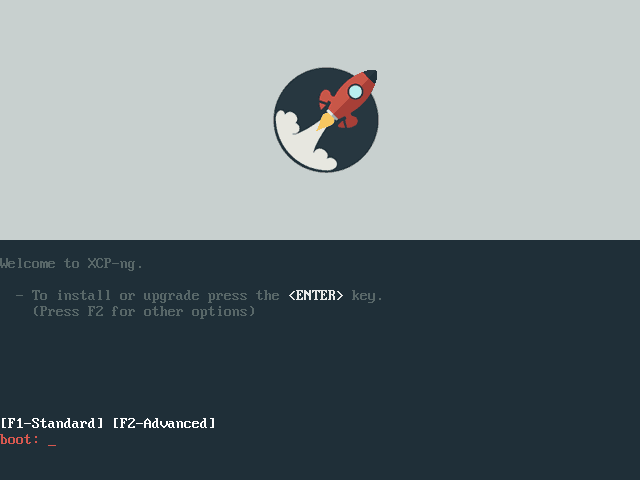
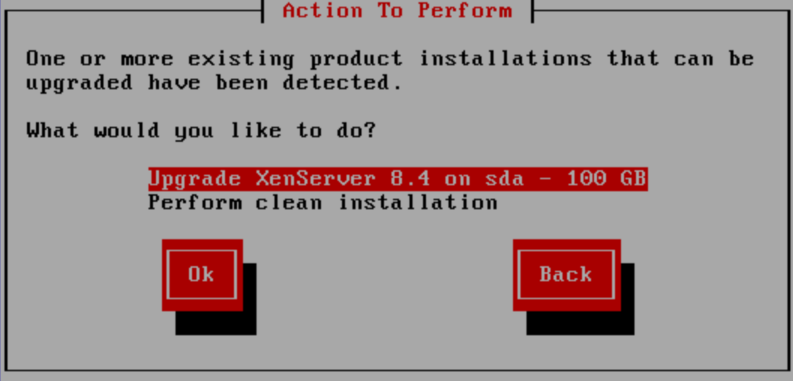
Eventually, you will reach a screen offering to upgrade your XenServer to XCP-ng:
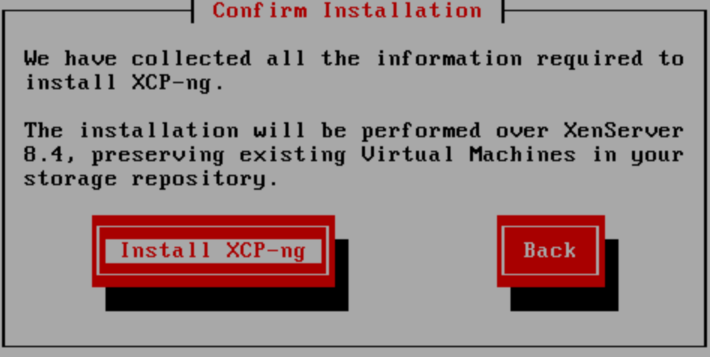
The installer will ask you to confirm the installation of XCP-ng over XenServer while preserving the existing VMs:
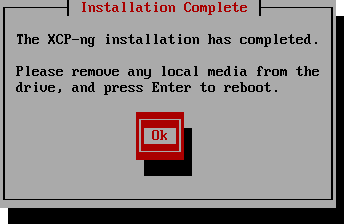
Once the installation process is complete, reboot your host:
Boot on your new XCP-ng and install the updates.
Enjoy XCP-ng, with all your previous settings, VMs, storage and network ready!
Note: if you have a pool, after you did that with the master, you can continue with the slaves, in the order you like.
Migration from XenServer 6.X
XenServer 7 introduced a new (and better) partition scheme. Therefore, if you want to migrate from a XenServer 6 version you have two possibilities.
- You can keep the old partition model (partitions are too small, it's NOT recommended!)
- You can "upgrade" it to the new scheme
As it's (obviously) a better partition scheme, we strongly recommend you to upgrade to this scheme and not to keep the old one, but it's your call.
Using the new partition scheme will REMOVE the content of your local SR.
Using the new partitions
In order to migrate using the new partition scheme, you need to run this command on your host before launching the migration process.
$ touch /var/preserve/safe2upgrade
Check that you are using GPT partitioning and not MBR and double check that you don't have any VDI attached to your local SR. Any remaining VDI will be removed.
Then, you can follow the standard migration procedure described above.
Migrating your XenServer Pool to XCP-ng with minimal downtime
Here is how to proceed in order to migrate with minimal downtime in your infrastructure:
- Live migrate your VMs from the pool master to other hosts
- Upgrade your pool master
- Live migrate VMs from another host to your pool master
- Upgrade the host
- Repeat until all hosts are migrated
Troubleshooting migration from XenServer
Alternate method: remote upgrade
If you do not have access to your server or remote KVM in order to upgrade using the interactive ISO installer, you can initiate an automatic reboot and upgrade process using the following procedure:
Unpack/extract the XCP-ng ISO to a folder on a webserver. Then get the UUID of your host by running the below command:
# xe host-list
Using that host UUID, as well as the URL to the folder hosting the unpacked XCP-ng ISO, run the following command to test access:
# xe host-call-plugin plugin=prepare_host_upgrade.py host-uuid=750d9176-6468-4a08-8647-77a64c09093e fn=testUrl args:url=http://<ip-address>/xcp-ng/unpackedexample/
The returned output must be true to continue.
Now tell the host to automatically boot to the ISO and upgrade itself on next reboot (using the UUID and URL from before):
# xe host-call-plugin plugin=prepare_host_upgrade.py host-uuid=750d9176-6468-4a08-8647-77a64c09093e fn=main args:url=http://<ip-address>/xcp-ng/unpackedexample/
The output should also be true. It has created a temporary entry in the grub bootloader which will automatically load the upgrade ISO on the next boot. It then automatically runs the XCP-ng upgrade with no user intervention required. It will also backup your existing XenServer dom0 install to the secondary backup partition, just like the normal upgrade.
To start the process, just tell the host to reboot. It is best to watch the progress by using KVM if it's available, but if not, it should proceed fine and boot into upgraded XCP-ng in 10 to 20 minutes.
Migrate VMs from older XenServer/XCP-ng
Live migration
Live migration should work from any older XenServer/XCP-ng toward the latest release. However, there are some cases where it doesn't. For example, XenServer (and XCP-ng) 7.6 has a regression that makes live migration with storage motion crash guests that are based on the "Other installation media" template when the source host has a version lower than 7.6. But this bug has been fixed in latest XCP-ng 7.6 updates.
Warm migration
If a live migration doesn't work, Xen Orchestra is able to do a warm migration for you. It's safer and still has a reasonable downtime. Read this dedicated article to learn more about it.
Handling alternate drivers or kernel
If - before the upgrade - your host depends on alternate drivers or on the alternate kernel to function, then it is possible that the upgraded system doesn't need such alternatives anymore. It is also possible that it still needs them.
When upgrading using the upgrade ISO:
- Alternate drivers will not be installed automatically: install them from the repositories after the first reboot.
- The alternate kernel will not be installed automatically, unless you tell the installer to do so (see Alternate kernel).
When upgrading using yum:
- Alternate drivers will usually be kept and upgraded if a newer version is provided, but that is not a general rule: we handle it on a case by case basis. Sometimes a newer "default" driver will obsolete an older alternate driver.
- The alternate kernel will be retained and upgraded to the latest version available in the new release. If the alternate kernel was your default boot option, it will remain such.